
At one time or another, almost every shooter can recall a time they shot a soda can, water jug, or watermelon just to see the awesome energy transfer from high-velocity projectile to object. The resulting explosion inspires awe and fascination, regardless of age. This entertaining sight represents terminal ballistics — what a projectile does upon target impact. Most of us have learned terminal ballistics through hunting, creative range targets, or watching others shoot ballistic gelatin. Ultimately, ballistic gelatin provides the most consistent medium for assessing a projectile’s terminal performance.
Why shoot ballistic gelatin? Without delving too far into the weeds, ballistic gelatin acts as a reference standard with a similar consistency, density, and tensile strength as human tissue. An animal’s body is a complex system comprising muscle, organs, fluids, bone, and cartilage intermixed at varying densities. With ballistic gelatin, the medium simulates tissue while allowing the user to carefully control its properties. Because of this, ballistic gelatin provides a level playing field for testing the performance of a variety of different projectiles.
Ballistic gelatin testing follows a standardized protocol established by the FBI and largely gleaned from Dr. Martin Fackler’s groundbreaking research in terminal ballistics. Surprisingly, ballistic gelatin isn’t outrageously hard to make if you’re willing to commit some time and experimentation to the process. So, how do you make ballistic gelatin? Since this topic has always intrigued me, I decided to put in the time to offer as much knowledge and information as possible on how to make homemade “bullet Jell-O.”
Ballistic Gelatin Ingredients and Supplies
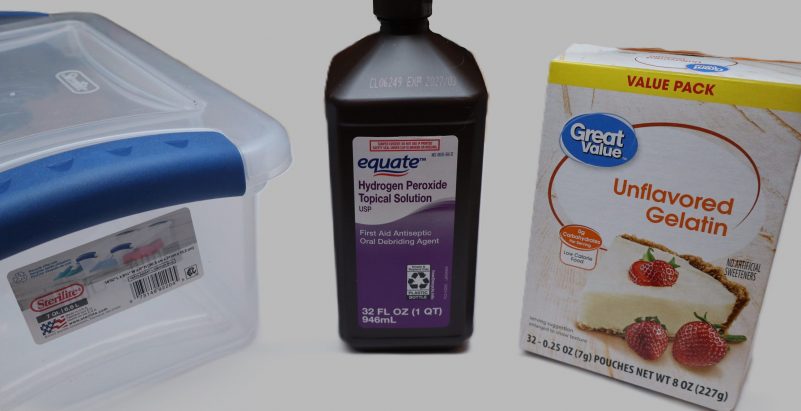
So, what do you need to make ballistic gelatin? Well, for the average person, almost everything you need is already sitting in your kitchen. Some things are must-haves, while others can aid in the process. The list below covers the basics, and we’ll discuss each of these items and their purpose in detail shortly.
- Gelatin – Preferably Knox Brand
- Water
- Pint- or Quart-sized measuring cup
- Hand whisk
- Spoon
- Mold for Gelatin (How you want the final gelatin block-shaped)
- Slow cooker or roaster
- Cheesecloth or fine mesh strainer
- Ladle or soup spoon
- Meat or candy thermometer
- Rubber or latex gloves (if you don’t want sticky hands)
The ingredient list is surprisingly simple and short, but the devil is in the details with ballistic gelatin. A brief internet search produces a laundry list of recipes and methods for producing ballistic gelatin. However, some of the available recipes fall short of the step-by-step to produce proper ballistic gelatin. While my method has worked for me, with no shortage of trial and error, I’m sure there are recipes out there that are more refined and perfected. This is my way, not THE way, and may change since learning is a lifelong commitment.
Making Ballistic Gelatin
The FBI standard for producing ballistic gelatin is a 10% mixture of 250-bloom Class A gelatin and water. Unfortunately, Knox, Great Value, and many other store-bought brands are in the 200 to 225 bloom content, which falls short of what’s needed. As a result, most homemade recipes require a higher gelatin concentration. For example, Great Value tends to be closer to a 1:7 gelatin-to-water ratio, while Knox is 1:8. As a result, homemade gelatin isn’t “FBI standard” because you need a higher gelatin content to pass the calibration test. Nonetheless, you can meet or approach the standard at home with this recipe. Now, with that disclaimer out of the way, here’s how to make your own ballistic gelatin.
The Mold
Start by choosing your mold and/or mixing container. For this, imagination is your friend. I recommend a mold measuring at least 5.5 inches square and 10 inches deep. Two of these will stop most expanding handgun bullets, while three will stop most rifle rounds.
I’ve tried inexpensive, clear plastic storage bins and .50-caliber ammo cans. I prefer ammo cans because they’re easily sealed, and the metal casing tends to keep the gelatin more temperature-stable. Removing the solid blocks from the container can be a bit of a struggle on your first try. A vacuum seal is created between the gelatin and can require digging your hands between the gelatin and sides to break it. However, the resulting mold is impressive.
Before using any mold, clean the interior and remove any dust, dirt, or debris. If using metal, be aware that the gelatin will react with any bare metal and discolor and rust a small portion of the block. This discoloration isn’t a big deal and only affects a thin layer, so you can peel it off without affecting the block’s effectiveness.
Mixing
Several brands of gelatin are readily available from your local grocery store. I’ve tested Great Value, Divided Sunset, and Knox gelatins. From my experience, Knox seems to be the clearest and most consistent of the store-bought brands I’ve tested. Compared to other brands, it’s a couple of dimes more expensive per ounce, so it’s not a significant price difference.
For ammo can gel blocks, around six quarts of cold tap water (192 ounces or 1.5 gallons) will suffice. Some recipes substitute one cup of water with hydrogen peroxide. Hydrogen peroxide clarifies the gelatin by removing some of the yellow tint. However, peroxide isn’t necessary if you don’t have it.
Next, add 24 ounces of Knox gelatin to obtain the 8:1 water-to-gelatin ratio. Knox offers eight and 16-ounce containers for around $15 and $25, respectively. Gradually mix the gelatin into the cold water. Don’t use an electric mixer! Hand mix the gelatin, as high-speed mixing will froth and cause the mixture to bubble.

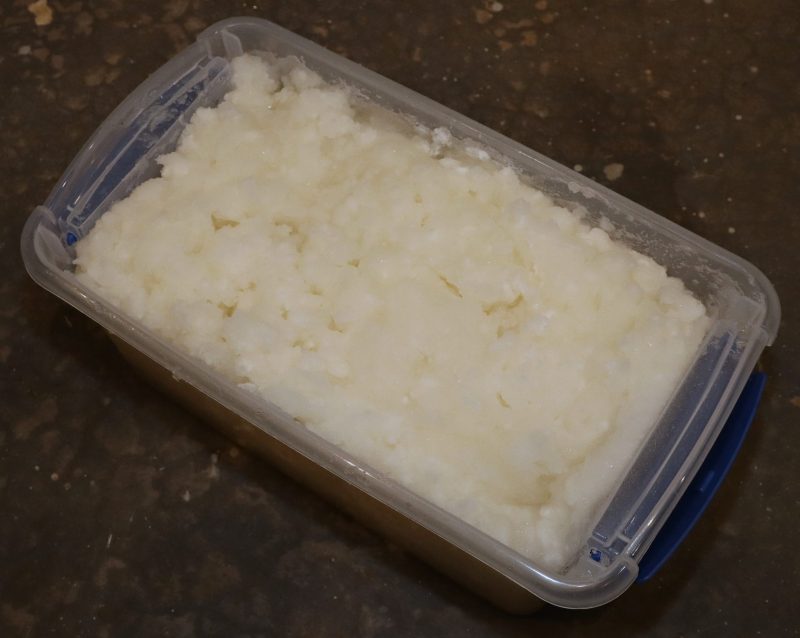
Add a few ounces of gelatin to the water at a time and mix thoroughly with a whisk or spoon. The gelatin powder tends to clump, so you’ll want to break it up as you mix. Latex or nitrile gloves come in handy here if you don’t want sticky fingers. The mixture will start like an apple sauce slurry. Once all the gelatin is added, it will thicken like clumpy mashed potatoes.
Mixing in a clear container allows me to see any remaining clumps. The gelatin mixture tends to separate from the thicker mixture at the top. If you mix and scoop from bottom to top, the gelatin mixture will appear more homogenous.
“Blooming”
Once the gelatin is thoroughly mixed, place it in a refrigerator to “bloom.” This process cools the gelatin and water mixture while helping the gelatin absorb water appropriately. I’ve tried blooming gelatin in a mini-fridge and don’t recommend it. Modern residential refrigerators circulate air, which produces more uniform cooling throughout the gelatin. I allow the gelatin to bloom for at least a few hours in the refrigerator. When ready, the gelatin should have a clumpy, firm texture similar to a hard Jell-O mixture. Once you’ve achieved this texture, the gelatin mixture is ready for the final process.
Heating
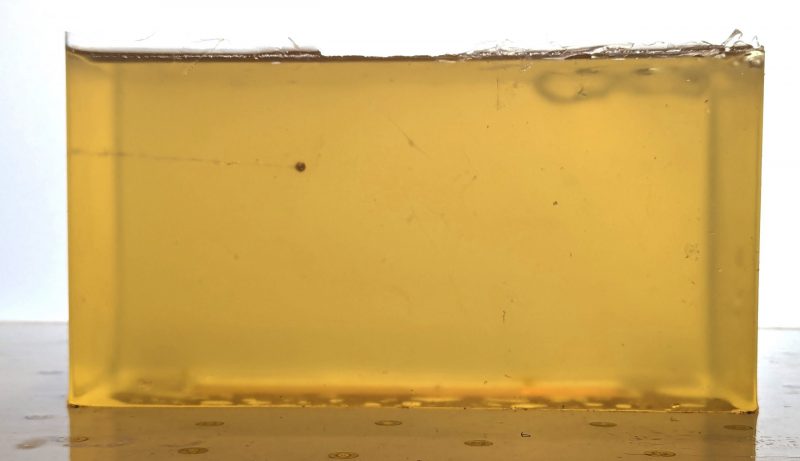
The care taken during this process will ultimately determine how your final block looks. The gelatin needs to be heated to a liquid to homogenize it and produce the unique semi-transparent appearance of ballistic gelatin.
Empty the bloomed gelatin into a slow cooker or turkey roaster set at or below 175° F. DO NOT exceed 175° F. Boiling or excessively high temperatures compromise the gelatin and degrade its strength and elasticity. If you don’t have a slow cooker or low-heat roaster, a water bath works as well. If using a water bath, monitor the gelatin’s temperature to ensure it doesn’t overheat.
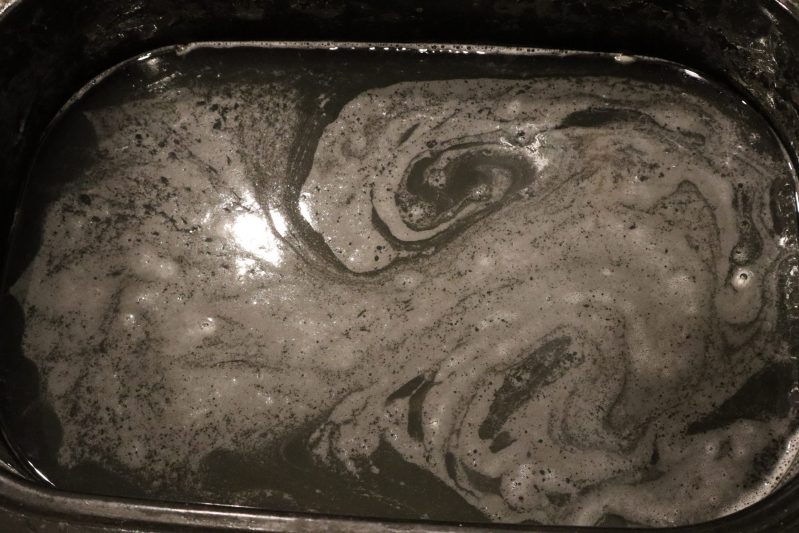
The gelatin mixture will gradually turn into a clear liquid. If a foam layer develops on top, scoop the foam off the top and discard it. Break up any remaining clumps with your hands (gloves come in handy here yet again), or allow them to melt with the mixture. If some small chunks remain, we’ll take care of that shortly.
Once the mixture is completely liquid, slowly pour it into your mold. I use a measuring cup to transfer the liquid to the mold and run it through a strainer or cheesecloth to catch any particles, debris, foam, or clumps I haven’t already removed. Once the mixture is in the mold, lightly tap the sides to remove any air bubbles clinging to the mold. You can also skim the top of the liquid with a spoon to remove any additional debris. Gelatin is a sticky, messy product. I highly recommend cleaning utensils and containers sooner rather than later.
Cooling the Gelatin
At this point, the gelatin is ready for cooling. As mentioned earlier, a modern full-size residential refrigerator provides even airflow around the mold and gelatin. If the mold doesn’t have a cover, apply cling wrap over the top. Over time, gelatin dries out and hardens if left uncovered.
I’m not the most patient man, but wait at least 48 to 72 hours before using the gelatin. This recipe produces a roughly 6”x6″x11” block weighing over 12 pounds. With that much mass, it takes time to thoroughly cool all of the gelatin and achieve a uniform temperature throughout. After several instances of impatience on my part, I’ve learned the block’s temperature plays a huge role in its performance and consistency. Ideally, the gelatin block should cool to 39°F.
Time to Shoot!
Once your gelatin is cooled throughout, it’s ready to soak up some bullets. However, if you recall this article’s title, this is Part 1.
For Part 2, I’ll delve into some of the best practices for transporting, setting up, and ultimately shooting your ballistic gelatin. While shooting gelatin is fascinating, there are some things to know and watch out for to make your experience enjoyable. There’s even a standardized protocol if you want to be a professional. Ultimately, the experience, the experiment, and the reliability of results come down to how much time, effort, and precision you want to exhaust on making your own ballistic gelatin.
The post Homemade Ballistic Gelatin: Part 1 appeared first on The Mag Life.
Read the full article here


