Red dot sights are nothing new. In fact, they appeared decades ago on competition rifles and pistols. As technology and quality advanced, red dot rifle sights eventually found their way into law enforcement and military applications. While the red dot sight was met with some skepticism, they ultimately became an accepted accessory in competition, fighting, and recreational rifles.
Coincidentally, pistol red dot sights have advanced far enough for widespread use amongst the shooting community. Less than a decade ago, few red dot pistol sights were capable of withstanding the rigors of combat or day-to-day carry. Today, the selections are endless with a wide range of options and price points. Somewhat ironically, naysayers still exist that dismiss pistol optics as a gimmick rather than an essential tool for improving the handgunner’s skillset. Whether for training, competition, or professional applications; the handgun red dot benefits anyone using it.
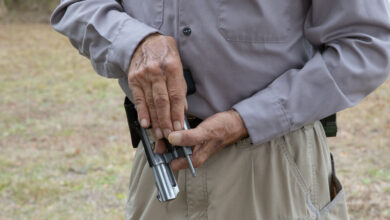
If you’ve made the decision to transition to a red dot or have already made the transition, you’ve probably done some research on the pros and cons of doing so. Rifle red dot optics require less training and accommodation when transitioning from iron sights. The pistol…not so much. The pistol requires practice and acclimation to the sight as well as understanding some of the red dot’s intricacies. While I’m no expert on red dot sights, I’ve learned some tricks to improve consistency, speed, and accuracy with presentation and sight acquisition in the time spent behind them.
The Quirks of Red Dot Pistol Sights
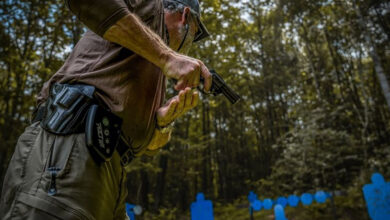
Pistol optics are definitely a different breed from rifle optics — especially when target presentation at speed becomes a factor. First, rifle optics are normally co-witnessed with the rifle’s iron sights and are easy to find if you’re used to irons. Furthermore, rifles offer four points of contact (hands, shoulder, and cheek) and a long radius that provides a consistent index point for the shooter. Conversely, handguns are supported by two hands and subject to small disturbances if the shooter’s presentation onto the target isn’t consistent. These issues, coupled with a smaller sight window, compound the problems many pistol red dot inductees encounter.
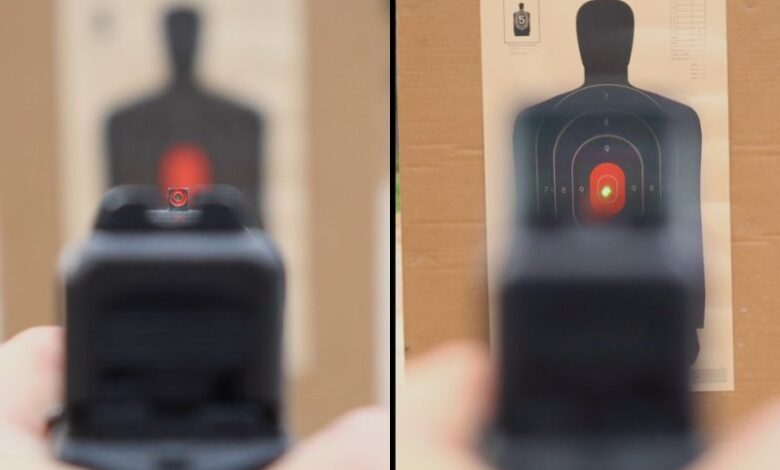
Speaking of smaller sight pictures, red dot optics have a relatively small footprint for improved carry and weight reduction. While convenient, this makes sight acquisition more difficult. If you’re like me, shooting a few hundred thousand rounds through iron pistol sights and then transitioning to a red dot is a significant adjustment. It’s easy to lose the dot in the window if your presentation isn’t consistent. Furthermore, optics often sit higher on the slide than traditional red dot sights. If a shooter is accustomed to presenting the handgun at a particular height to acquire iron sights, the red dot alters that presentation height and requires re-training.
Finally, sight focus changes with a red dot sight. For years, I learned and practiced front sight focus to engage a target. Red dot optics don’t require traditional sight alignment, so many assume they should focus on the dot. In reality, the shooter focuses on the target. While similar to shooting a red dot-equipped rifle or shotgun, the pistol remains a challenge for the aforementioned reasons, as well as many more that won’t be discussed today. Regardless, retraining the brain to accommodate these small differences requires practice and conscious adjustment. However, I’ve discovered — and learned from others — a few tricks that make the transition from irons to red dot a little easier.
Retraining with Red Dot Pistol Sights
Before delving into some of the tips and tricks, I should include a disclaimer of sorts. Competency with any tool comes with practice and exposure. While training sessions with hundreds of repetitions throughout the week benefit anyone, this kind of time commitment isn’t always practical. Nonetheless, a few dozen dry fire repetitions or 100 rounds in a live fire session benefit everyone. Small quantities of practice over time are more beneficial than no practice at all.
Reverse Your Training
One of the biggest issues encountered with many new red dot pistol shooters originates with finding the red dot sight during the draw. Often, shooters try to present the gun to the target before “finding” the dot. When first learning how to use a red dot, progressive training helps greatly with adjusting to the optic. Let’s expand on what that means.
When teaching a proper draw technique, shooters begin by breaking down the draw and presentation to the target into a step-by-step process. When adjusting to red dot sights, reverse this same training process. The goal isn’t to teach the shooter a proper draw — they should already know how to do this. Rather, the process is focused on teaching proper sight acquisition with the red dot. Effectively, start with sights already on target and practice focusing on the target. Then, start at low ready and present and find the optic. You can then start with the firearm in a combat tuck or retention position, followed by a presentation on the target. This progressive step-by-step addition of actions gradually acclimates you to the slight adjustment in presentation with a red dot. Effectively, you’re reverse engineering your draw.
Settling the Dot
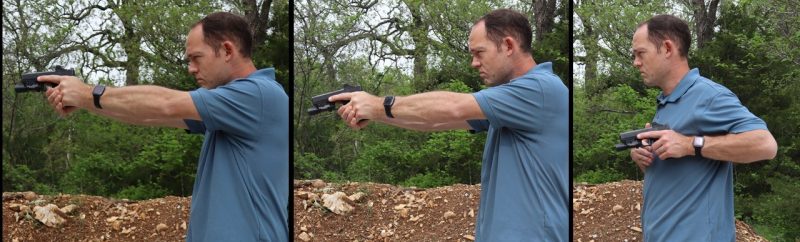
When drawing a firearm, common teaching advocates “punching” out toward the target during presentation. Some newer shooters draw with a “bowling” or “casting” motion, swinging the muzzle from the ground to the target or the sky to the target. This inefficient draw action slows presentation onto the target while causing the sights to swing past the target instead of going toward it.
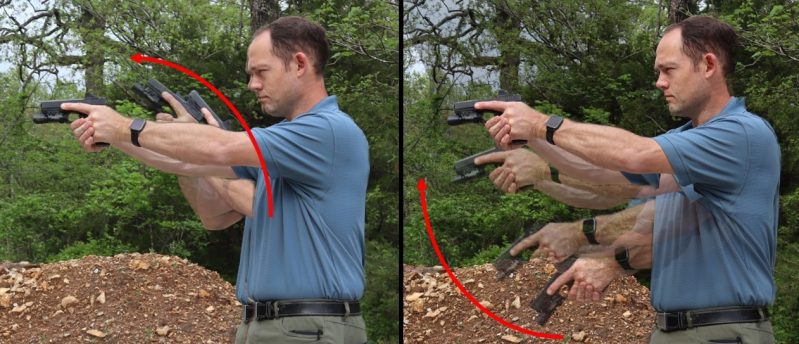
The reason for discussing proper draw is there’s a slight exception to this rule with red dot sights. Whenever a shooter struggles to find the dot, I have them draw and present to the target with the muzzle angled up slightly. Basically, the gun presents towards the target a bit like an airplane about to land. As they approach full extension at the target, I have them settle the muzzle into the target and bring the back sight up and level with the front sight. This motion helps the shooter maintain a linear motion towards the target, and the optic’s dot settles nicely into the window as they reach full extension and drop the muzzle onto the target.
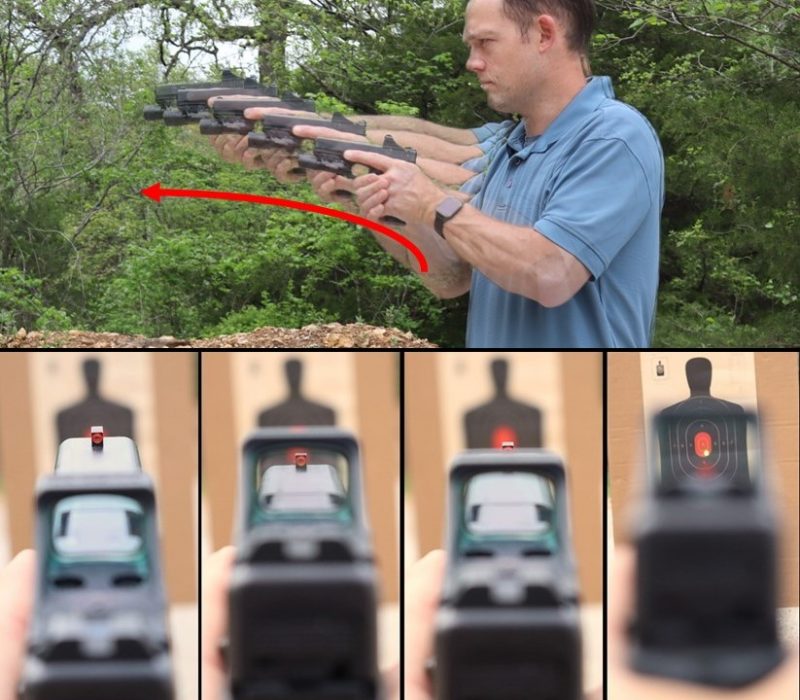
“Settling the dot”, as I refer to it, is a simple method of building confidence in your optic. Part of this method’s success has to do with the shooter indexing off the handgun’s sights and/or slide plane. The eyes see the pistol’s orientation and visually align it with the target. Instead of just looking at the back of a handgun, there’s a visual reference point for how the gun is oriented as it approaches the target. This gives the shooter ample time to adjust and align the gun for proper presentation on the target with a visual index point.
Push Your Limits
Red dot sights provide shooters with immediate feedback that they otherwise overlook with iron sights. It’s harder to notice slight tremors, sight misalignment, and/or improper mechanics with irons. However, the red dot doesn’t lie. If not properly aligned, the dot won’t be on target. Furthermore, the red dot spotlights improper shooting mechanics. For example, when the dot jerks off target during the shot, many shooters self-diagnose from this observation.
When practicing with a new piece of equipment, you must build confidence to truly be capable with it. Thus, once you’ve become comfortable with acquiring the dot, start pushing yourself with speed on target. From that, practice faster follow-up shots and, if practical, transitioning between targets. By pushing out of your comfort zone, you will eventually miss shots. However, by forcing failure, you identify some important things: (1) you recognize your current failure point with a red dot, and (2) you learn your capabilities with a red dot. Ultimately, pushing yourself with a red dot builds confidence in your equipment and your skills.
The post Irons to Optic Sights: Making the Pistol Transition appeared first on The Mag Life.
Read the full article here